
You are using an out of date browser. It may not display this or other websites correctly.
You should upgrade or use an alternative browser.
You should upgrade or use an alternative browser.
What did you do to your X1/9 today ?
- Thread starter Eastep
- Start date
Alain - The Red Scorpion
True Classic
Had to tuck some hoses away to get access to the bolts and to jam the starter through. Mind you I also have an oil cooler with its hoses in the way...Thanks. And did it help a bit with hose clearance? Seemed likely to my eyeball.
Alain - The Red Scorpion
True Classic
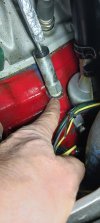
Also meant to reply to the post regarding oil seeping from around the oil sender. In my case, it was not the oil sender but the oil dipstick tube that threads into the block. Removed it, wrapped it with silicone tape and re-installed it tight. Problem solved.
Attachments
tigeravg
True Classic
My interest was in how the rad hoses now fit. Or if there is any difference at all.Had to tuck some hoses away to get access to the bolts and to jam the starter through. Mind you I also have an oil cooler with its hoses in the way...
ng_randolph
Bjorn H
Thanks. And did it help a bit with hose clearance? Seemed likely to my eyeball.
The hoses fit fine with the gear reduction starter, but I don't remember if if there was an improvement over the fit with the OEM unit. Access to the electrical connections is much better with the gear reduction unit; they are in plain view from below. I know people are able to replace the starter working from above, and complain about how difficult it is. Working from below, starter replacement is trivial.My interest was in how the rad hoses now fit. Or if there is any difference at all.
JKIDD
Auto Addict
Last year I had both types trying to get 1 to work. I don't remember any significant weight difference. I ended up going with the gear reduction unit. I still have the old starters (hoarder) & see if I can get a weight on them.I wonder if there's much difference in weight between a original MM starter and a original Bosch one?
My1stCar
True Classic
We participated in a classics car regularity rallye. The older the car the lower the multiplication factor of the penaty points

The orange 1975 Corvette finished 2nd and the Peugeot 104 ZX Ralley (bi-color white/blue next to us) 1st..
The oldest car was a Triumph TR3 of 1959 in the back of the picture, with several Austin Healies of '59, '60 and '62.

Next a 1968 Volo Amazon and a rare Honda S800 of '69 (bought by the current owner in 1974!)

This was our first roadbook rallye, expectations were low, and we needed the GPS "safeguard" instructions to make it on time to lunch and dinner, but managed some parts rather well (depending on the type of instructions used in the roadbook) and enjoyed the well-organised event (despite the rain).
We later heard from other participants with over 20 years of this type of events under their belts that this was one of more complicated ones, and the reason they came to this event, others being "not challenging enough".
We'll definitely will do a similar event in the future, but will target a simpler version (and practice more)
The orange 1975 Corvette finished 2nd and the Peugeot 104 ZX Ralley (bi-color white/blue next to us) 1st..
The oldest car was a Triumph TR3 of 1959 in the back of the picture, with several Austin Healies of '59, '60 and '62.
Next a 1968 Volo Amazon and a rare Honda S800 of '69 (bought by the current owner in 1974!)
This was our first roadbook rallye, expectations were low, and we needed the GPS "safeguard" instructions to make it on time to lunch and dinner, but managed some parts rather well (depending on the type of instructions used in the roadbook) and enjoyed the well-organised event (despite the rain).
We later heard from other participants with over 20 years of this type of events under their belts that this was one of more complicated ones, and the reason they came to this event, others being "not challenging enough".
We'll definitely will do a similar event in the future, but will target a simpler version (and practice more)
Dr.Jeff
True Classic
Lots of very cool cars there.We participated in a classics car regularity rallye. The older the car the lower the multiplication factor of the penaty points
View attachment 84455
The orange 1975 Corvette finished 2nd and the Peugeot 104 ZX Ralley (bi-color white/blue next to us) 1st..
The oldest car was a Triumph TR3 of 1959 in the back of the picture, with several Austin Healies of '59, '60 and '62.
View attachment 84456
Next a 1968 Volo Amazon and a rare Honda S800 of '69 (bought by the current owner in 1974!)
View attachment 84457
This was our first roadbook rallye, expectations were low, and we needed the GPS "safeguard" instructions to make it on time to lunch and dinner, but managed some parts rather well (depending on the type of instructions used in the roadbook) and enjoyed the well-organised event (despite the rain).
We later heard from other participants with over 20 years of this type of events under their belts that this was one of more complicated ones, and the reason they came to this event, others being "not challenging enough".
We'll definitely will do a similar event in the future, but will target a simpler version (and practice more)
")
Alain - The Red Scorpion
True Classic
I'm replacing the clutch slave cylindre on my 1980. You mention bench priming. How? ThxFound my slave cylinder was leaking last week. Ordered a replacement from MWB. Bench primed it as best I could. Installed and bled it. Re adjusted the clutch...Good to go! Beautiful day today, sunny and in the low 60's. Headed down the Jersey shore to visit my sister. I'm not a fan of droning down the highway for miles on end, (Especially when I have so many excellent roads near where I live) but I was so pleased with the way my car just purred down the Garden State Parkway. 70 to 80 MPH (3800 to 4200 rpms) for an hour each way, without skipping a beat. Car felt like it could it all day long! P.S. I'm knocking on my wooden desk, as I write this!
Tom Ginefra
True Classic
I'm sure some would say it's not necessary, because the cylinder displaces such a small amount of fluid when actuated. Really it's just making sure it works, and that you have as much fluid in the slave as you can, to displace as much air as possible before installation. Similar to how you'd prime a master, but on a smaller scale. Place in vice, remove plug, carefully actuate the piston to express whatever fluid may have come with the cylinder, refill and top off with your own fluid. Re apply the plug and do your best to spill as little as possible during installation. In my opinion it also makes the bleeding easier. I can't remember how many times I had to actuate the clutch when bleeding the original slave I installed, but it seemed this time it went much faster. I had a helper and mine was fully bled in 2 or 3 pumps of the clutch. It helps of course, to have something you can hook behind the clutch pedal, (while seated) to retract the pedal when the spring goes over center and the pedal stays on the floor for the first pump, or so.I'm replacing the clutch slave cylindre on my 1980. You mention bench priming. How? Thx
Alain - The Red Scorpion
True Classic
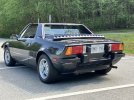
Black Beauty. Bravo!Completed my bumper conversion. Special thanks to Doug for the custom bracketsView attachment 84459
Alain - The Red Scorpion
True Classic
Many thanks. Forza XI'm sure some would say it's not necessary, because the cylinder displaces such a small amount of fluid when actuated. Really it's just making sure it works, and that you have as much fluid in the slave as you can, to displace as much air as possible before installation. Similar to how you'd prime a master, but on a smaller scale. Place in vice, remove plug, carefully actuate the piston to express whatever fluid may have come with the cylinder, refill and top off with your own fluid. Re apply the plug and do your best to spill as little as possible during installation. In my opinion it also makes the bleeding easier. I can't remember how many times I had to actuate the clutch when bleeding the original slave I installed, but it seemed this time it went much faster. I had a helper and mine was fully bled in 2 or 3 pumps of the clutch. It helps of course, to have something you can hook behind the clutch pedal, (while seated) to retract the pedal when the spring goes over center and the pedal stays on the floor for the first pump, or so.
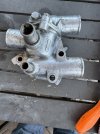
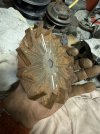
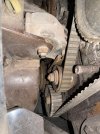
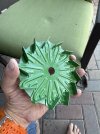
Well I took the alternator, water pump and timing belt off,awaiting parts from Bayless, painted pulleys in red green and white looks awsome, doing a lot of cleaning on the engine.these old 20+ years parts are nastyIts pretty simple all you do is simply tell us what you've done to your X1/9 during the current day or in the late evening prior. It can be anything from a fun drive, wash/wax, to engine rebuilding etc.. Pics and video are always welcome for incrimination..
 ,
,Attachments
KBabcock
True Classic
Main that looks great, what are they 74 bumpers or something else?Completed my bumper conversion. Special thanks to Doug for the custom bracketsView attachment 84459
Schuey
Driver
Euro spec bumpers. Found them in Germany.Main that looks great, what are they 74 bumpers or something else?
CandBMotorworks
C&BMotorworks
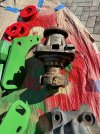
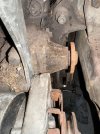
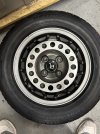
This has actually been an ongoing project, but today I finally got all the pieces to put on replacement center caps on my refinished (by me) wheels. Here's a photo of one of the rears that is off the car because I am in the middle of rebuilding the axles due to CV boot failure. For the centers I went to a paint store and got paint made to match as closely as possible to the paint on the interior of the wheel (covered by the tire) and what was left on the wheels before I stripped and repainted them. I also painted the lugs to match, with the idea that they would basically "disappear" in the center. I am a rank amateur, but still I like how they turned out.
Attachments
DanielForest
True Classic
Great. Also, you may paint the tip of your running shoes in garage floor grey, So they will disappear in the pictures...This has actually been an ongoing project, but today I finally got all the pieces to put on replacement center caps on my refinished (by me) wheels. Here's a photo of one of the rears that is off the car because I am in the middle of rebuilding the axles due to CV boot failure. For the centers I went to a paint store and got paint made to match as closely as possible to the paint on the interior of the wheel (covered by the tire) and what was left on the wheels before I stripped and repainted them. I also painted the lugs to match, with the idea that they would basically "disappear" in the center. I am a rank amateur, but still I like how they turned out.

Dr.Jeff
True Classic
For once you were actually funny.Great. Also, you may paint the tip of your running shoes in garage floor grey, So they will disappear in the pictures...
Alain - The Red Scorpion
True Classic
Slave cylinder is in. Raised the front. Fluid is coming out to the unattached hose at the slave cylinder. When I connect the hose and open the bleed screw, nothing comes out. The pedal goes to the floor with no resistance. I'm at a loss as to why fluid is in the hose but won't come out of the bleed screw? Should I keep pumping the pedal?I'm sure some would say it's not necessary, because the cylinder displaces such a small amount of fluid when actuated. Really it's just making sure it works, and that you have as much fluid in the slave as you can, to displace as much air as possible before installation. Similar to how you'd prime a master, but on a smaller scale. Place in vice, remove plug, carefully actuate the piston to express whatever fluid may have come with the cylinder, refill and top off with your own fluid. Re apply the plug and do your best to spill as little as possible during installation. In my opinion it also makes the bleeding easier. I can't remember how many times I had to actuate the clutch when bleeding the original slave I installed, but it seemed this time it went much faster. I had a helper and mine was fully bled in 2 or 3 pumps of the clutch. It helps of course, to have something you can hook behind the clutch pedal, (while seated) to retract the pedal when the spring goes over center and the pedal stays on the floor for the first pump, or so.