
You are using an out of date browser. It may not display this or other websites correctly.
You should upgrade or use an alternative browser.
You should upgrade or use an alternative browser.
What did you do to your X1/9 today ?
- Thread starter Eastep
- Start date
fiatmonkey
Tim Hoover
K20 Shifter installed/mounted...
SLOOOOOWLY getting things done. Also POR-15'd the engine bay but pics didn't come out well. Nothing to really see. It's all black")
SLOOOOOWLY getting things done. Also POR-15'd the engine bay but pics didn't come out well. Nothing to really see. It's all black
fiatmonkey
Tim Hoover
Today I entered the world of X ownership, bought a 1988 from original owner and drove it home 120 miles with no issues. Looking forward to lots of adventures. :thumbsup:
Congrats and welcome to the wonderful world the X!!
myronx19
True Classic
Today:
- changed timing belt and tensioner (supplied by Midwest-Bayless)
- reinstalled rebuilt alternator (Bosch)
- replaced heater control valve
- flush & fill coolant
- oil change
- set timing
- change plugs
- pulled out some funky electrical mods I did years ago
- took it for a test drive - all ok!
wphew.. changing the heater control valve is a total PITA!
Yes it is Myron
I have done 2 of them in the last few years. Not a lot of fun to be had on that project.
wphew.. changing the heater control valve is a total PITA!
I have done 2 of them in the last few years. Not a lot of fun to be had on that project.
fiatmonkey
Tim Hoover
Engine firewall insulation...
Installed. Ready to drop the K20 in...!
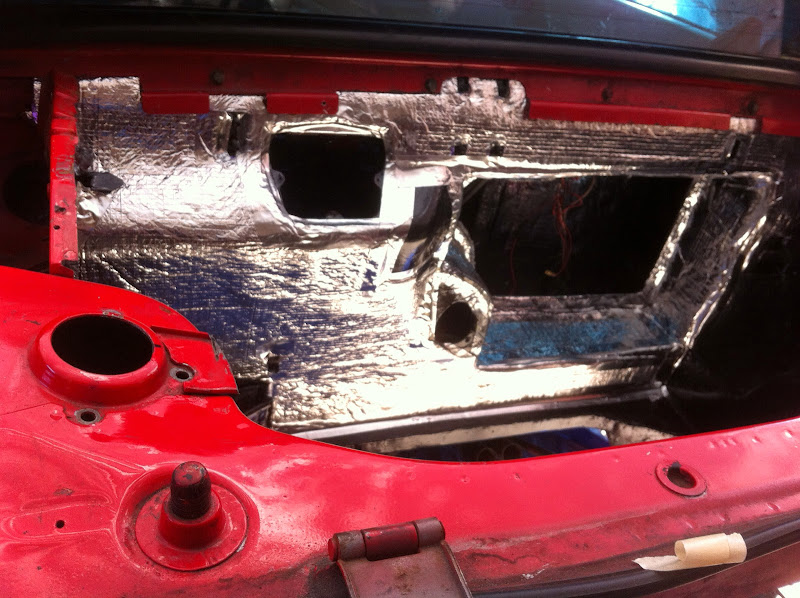
Installed. Ready to drop the K20 in...!
Andy
True Classic
Loaded on the trailer...
I sold this car several months ago to Scott Weiner, (xunonove here on Xweb). After an engine rebuild and brake overhaul it is finally ready to transport across the country.
Here is a short clip of it going on the trailer.
I feel a bit melancholy knowing that I will only drive this car one more time (to drop it off the trailer so it can go on the transport to Boston).
http://xwebforums.org/member.php?u=2596

dragonsgate
True Classic
 Today I am putting the motor and trans back in for the second time in as many days. I have been working on this for over a couple of weeks now. The car was running fine and the days are warm but I have been wanting to replace the original steel adapter plate ever since I first did the build. I also did a redesign on the coupler. I managed to shave two and a half pounds of the adapter plate but gained almost three pounds on the coupler. It is about as dead on as it will ever get and that baby is balanced to a tent of a gram and is probably good for 20K rpm if everything held together. Once I get rolling again I am going to replace the yellow cross member with an aluminum one I have on the drawing board. Them eventually the front yoke/alt bracket will be aluminum also.
fiatmonkey
Tim Hoover
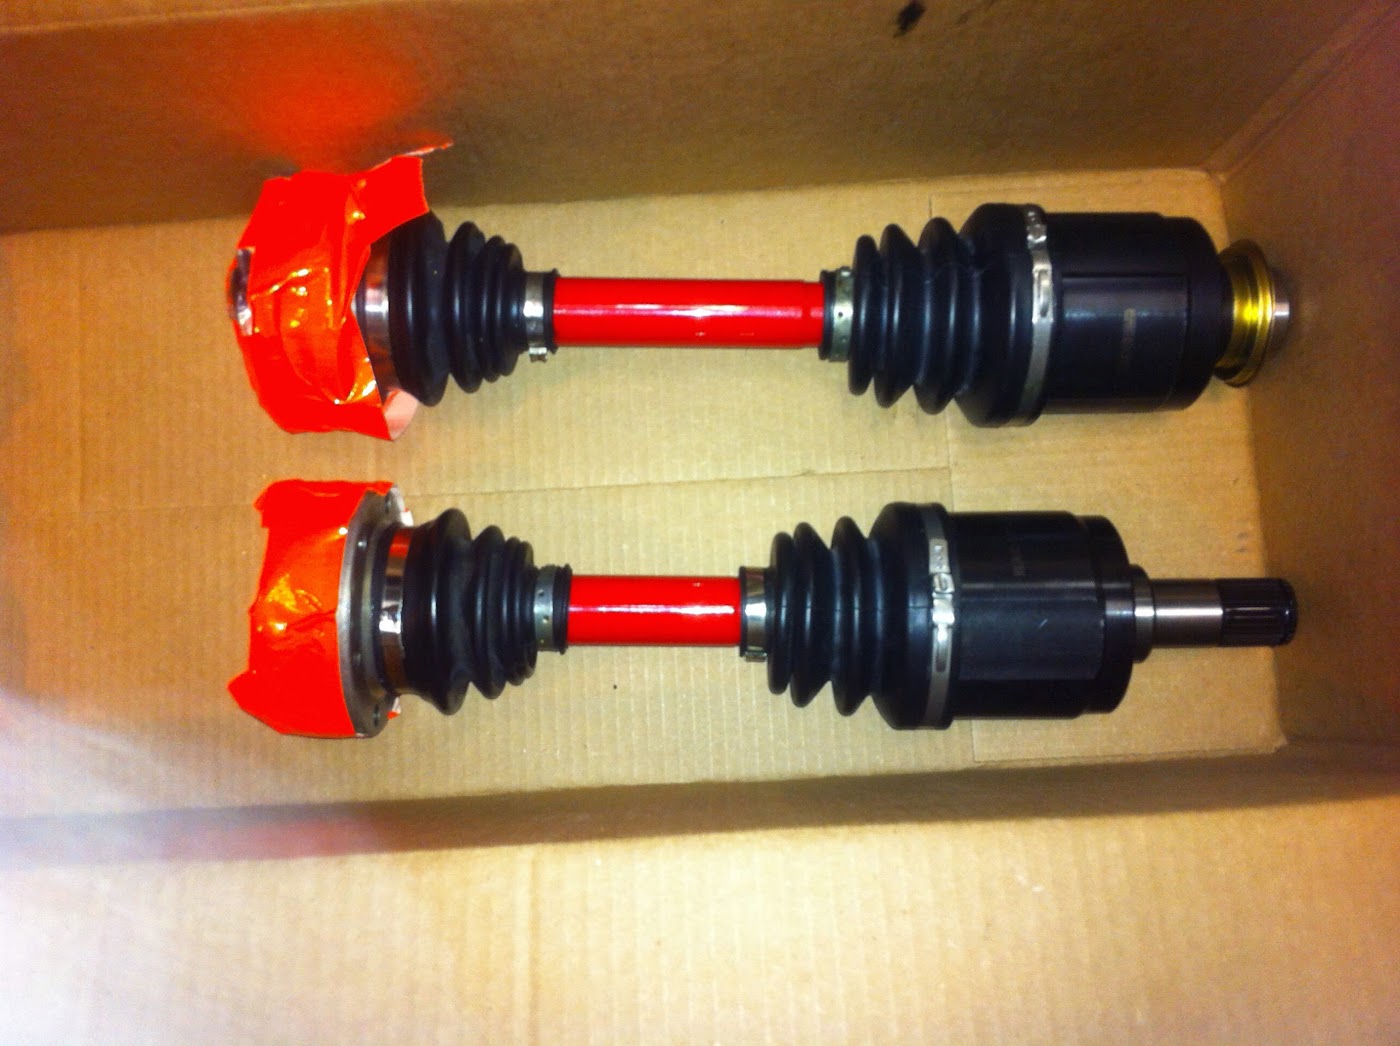
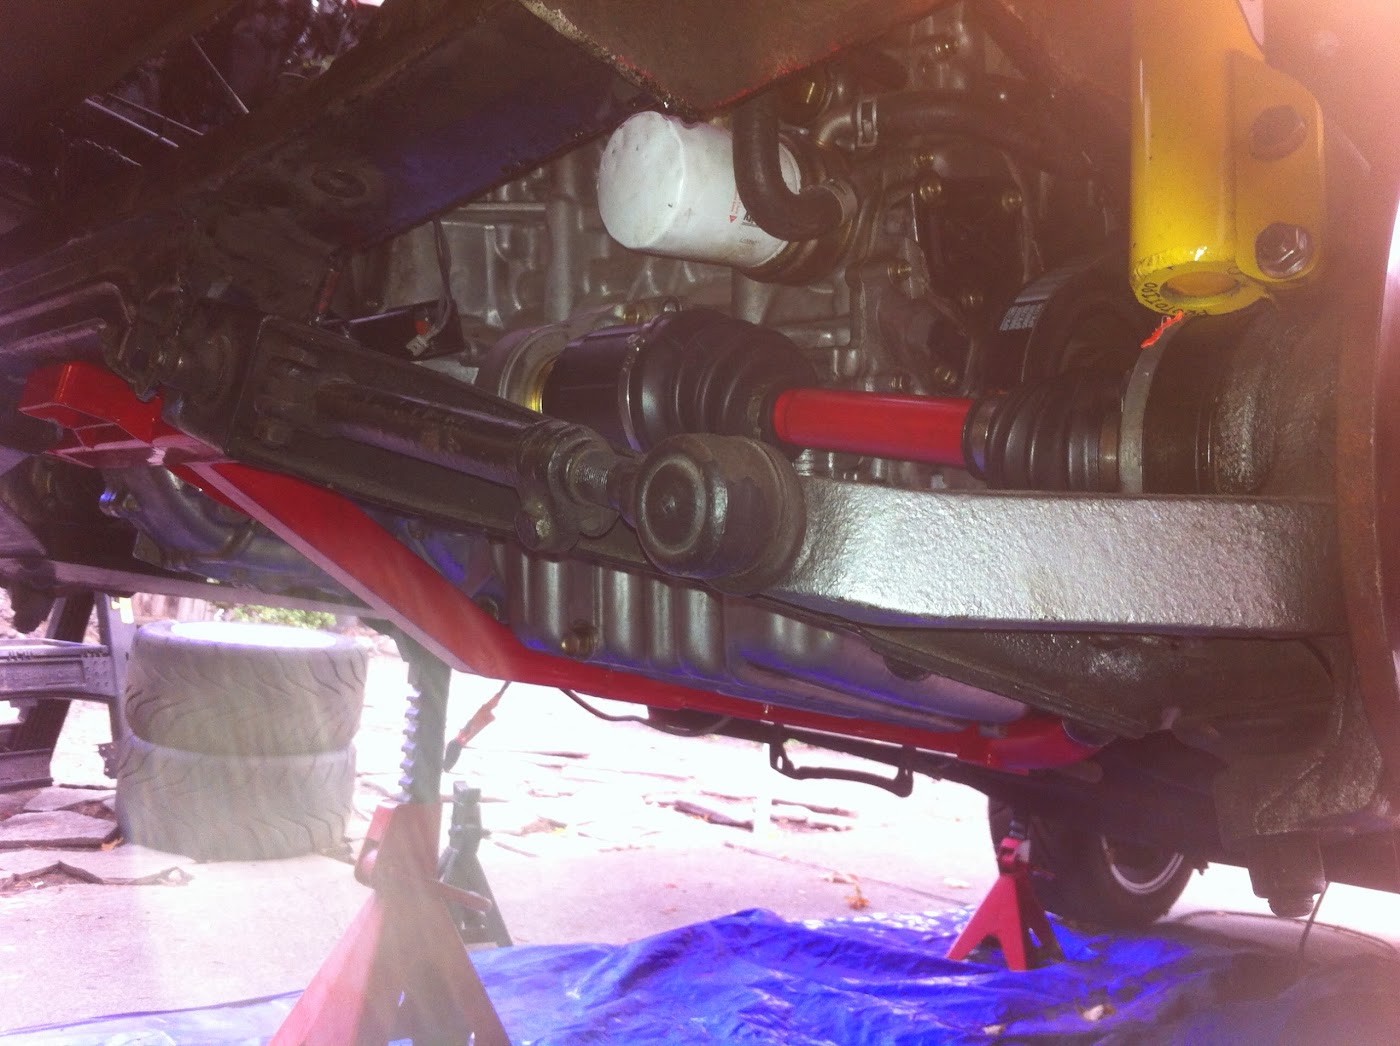
finished the k20 axles today...
Good knows was out of the 4 donor CV joints I had, 2 were solid. Cleaned/repacked and installed with the k20 inner CVs.

Good knows was out of the 4 donor CV joints I had, 2 were solid. Cleaned/repacked and installed with the k20 inner CVs.
PurdyDot
True Classic
Installed rear window.
Special thanks to JimD for providing me with the window (And for the stellar job of packing it so it'd get here unbroken, it was a masterpiece, I should have taken pictures), and to my wife for staying up late and helping me get that sucker installed.
Oh, and I should thank xweb and it's members as well, because without all the instructions/tips/advice I found here from other people's experiences doing that job, I would have been in a world of hurt
My own personal bit of advice for anyone else who needs to do that job in the future:
This job can be a real booger. I'd say the most Important tips that I found on here were to have some soapy water handy, and have another person help, or if you can, *two* extra people.
For the soapy water, I used a little generic $1 spray bottle I'd picked up from the walmart cosmetics section. Originally bought two of these (one for gas, and an extra one just because they looked handy) to do little squirts of gasoline into my intake during troubleshooting because the only way to keep the engine running was to keep adding gas manually. But I'll go ahead and mention that the one I was using for gas didn't work very well after a while. My guess is that the pumps on these aren't really designed to survive constant exposure to gasoline.
They work great for spraying soapy water though, and I ended up having to spray various places about a million times (maybe a slight exaggeration) to get that sucker to slide.
Soaking the entire groove in the upper gasket probably would have helped a great deal, but by the time I knew that, it was a little too late.
The second set of extra hands would have been helpful because it's kinda hard to go back and forth to each side to figure out what's going wrong and fix it if you are stuck having to hold up one side.
In my case, this problem was compounded because the car was up on jack stands, making it somewhat impossible to reach far enough to support the glass from the center.
Something I will add, is that if your rear window has heater strips...
There should be a wide stripe going up near each end.
Those stripes/strips are far enough in from the edge, and wide enough, that they will be partially exposed/visible after the window is wedged up into the gasket.
So, they can be used as a guide to tell you if the window is centered.
So if the window is stuck and doesn't want to go up any further, check those stipes. if one looks like it's 3/4 of an inch wide, and the other looks like it's only a 1/4 inch wide, you're gonna have to let it back down a little and try to get it to slide sideways a bit till both sides are equal.
Once the glass is up past a point, it gets a lot easier to shift around, but getting it there can be a pain.
Anyway, I didn't actually do this job today, it was earlier in the week. I think I started Sunday and ended up finally being done some time Monday morning. When it was finally done my clothes were so drenched in sweat that they literally couldn't have been wetter if I'd drenched myself with a garden hose. lol
It's in though! And that's what counts
Fitted
a new speedo cable .......only purchased the car two weeks ago and apart from bringing her home she hasn't moved........changed that today took her for a drive with the top off (the roof that is ) not a bad day for middle of winter here in NZ.......tomorrow is a wash and polish
a new speedo cable .......only purchased the car two weeks ago and apart from bringing her home she hasn't moved........changed that today took her for a drive with the top off (the roof that is
) not a bad day for middle of winter here in NZ.......tomorrow is a wash and polish fiatmonkey
Tim Hoover
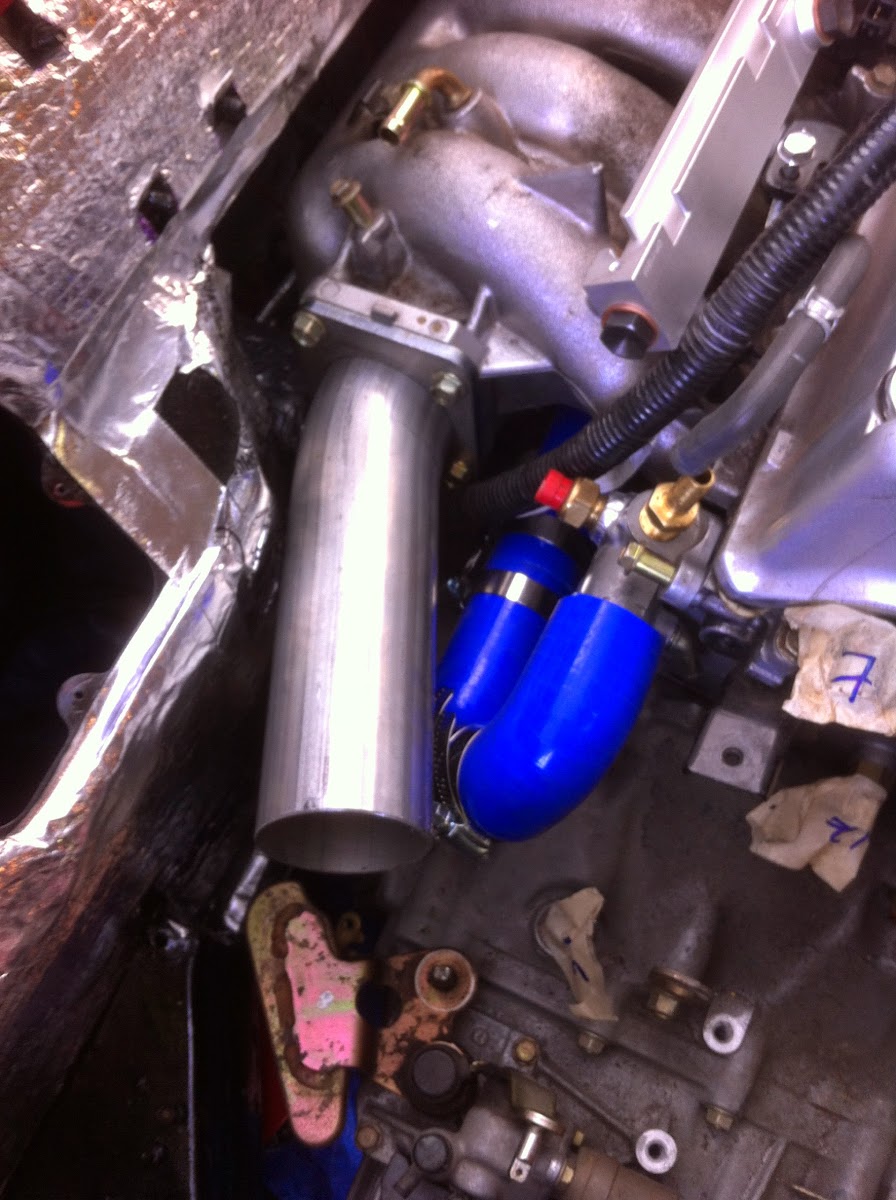
More plumbing done on k20 done today...
I was having a real problem with the tight space for running the rad/heater core and overflow tank lines...I am hoping this does it...

I was having a real problem with the tight space for running the rad/heater core and overflow tank lines...I am hoping this does it...
dragonsgate
True Classic
Wheel bearings
I just put a new wheel bearing on the right front corner today. My car runs pretty silent so I can hear just about every squeak as soon as it starts. I have been listening to a very low growl for several weeks now. I did the rear bearings a month or so ago and have been threatening to do the fronts. I had jacked the car up several times suspecting the right side bearing making the noise but when I spun the tires by hand both bearings sounded smooth even with the stethoscope. This past Friday I decided to do the bearings no matter what. Jacked up the car thinking I would do the right side first and when I spun the tires the left side sounded like it had rocks for bearings so I changed it. I drove the car the next day and everything was quiet. Today I decided to go ahead and change the right side. Having a bearing press made everything so much easier and neater than banging them in and out with a hammer. Now I have to see what new noise develops.
I just put a new wheel bearing on the right front corner today. My car runs pretty silent so I can hear just about every squeak as soon as it starts. I have been listening to a very low growl for several weeks now. I did the rear bearings a month or so ago and have been threatening to do the fronts. I had jacked the car up several times suspecting the right side bearing making the noise but when I spun the tires by hand both bearings sounded smooth even with the stethoscope. This past Friday I decided to do the bearings no matter what. Jacked up the car thinking I would do the right side first and when I spun the tires the left side sounded like it had rocks for bearings so I changed it. I drove the car the next day and everything was quiet. Today I decided to go ahead and change the right side. Having a bearing press made everything so much easier and neater than banging them in and out with a hammer. Now I have to see what new noise develops.
fiatmonkey
Tim Hoover
Progress on the K20 install...
Finished the axles.
Installed the engine

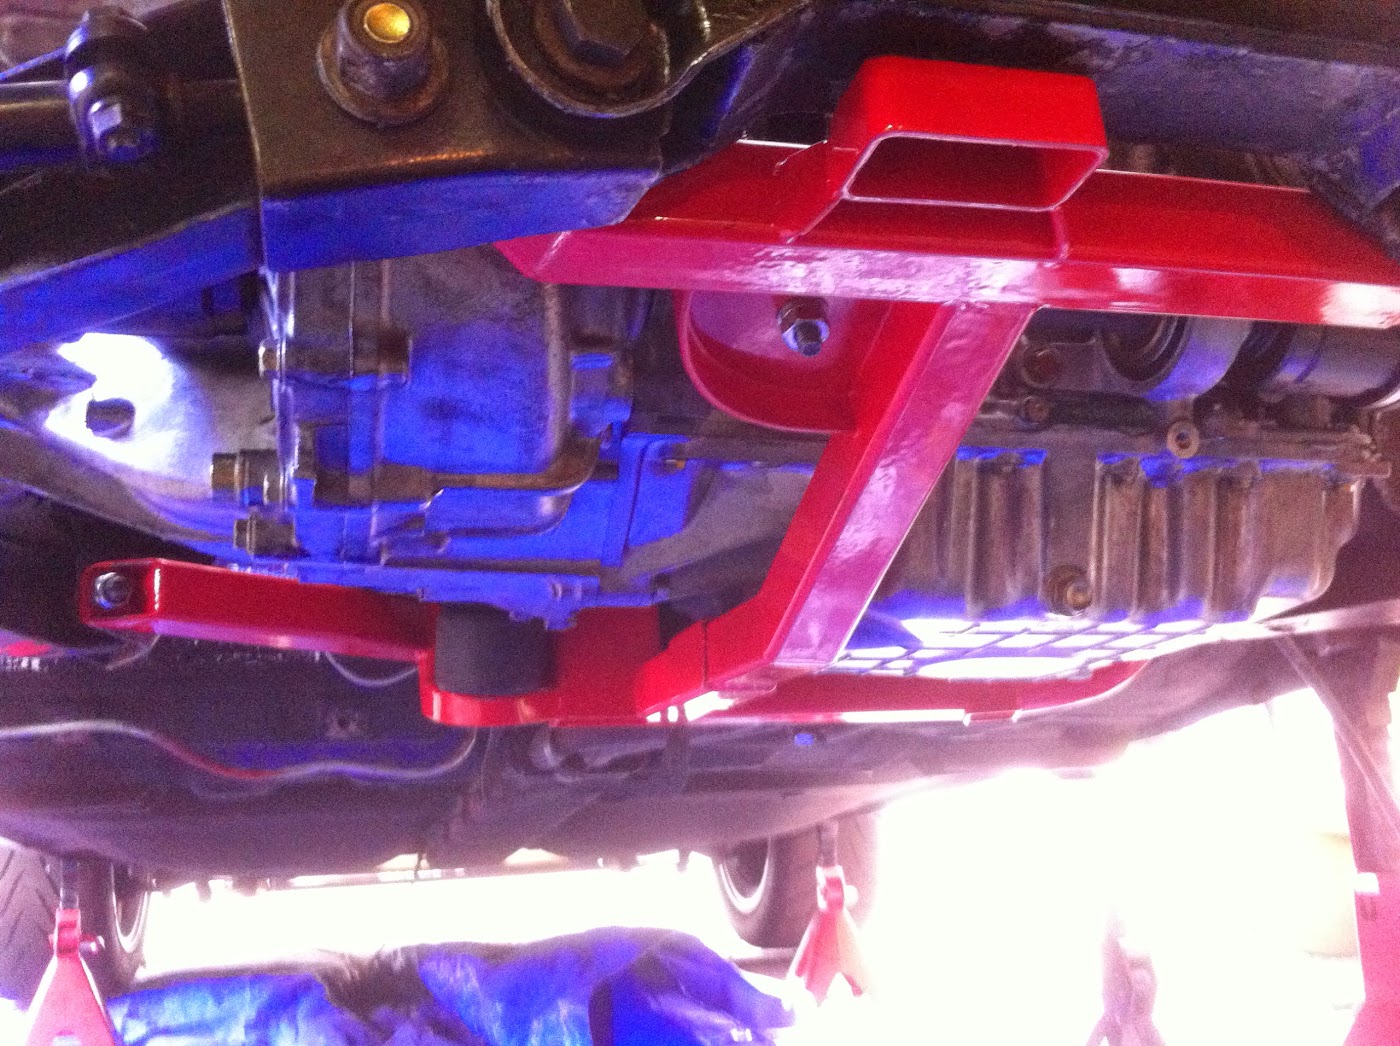
LOTS more to do but making progress.
Finished the axles.
Installed the engine
LOTS more to do but making progress.
fiatmonkey
Tim Hoover
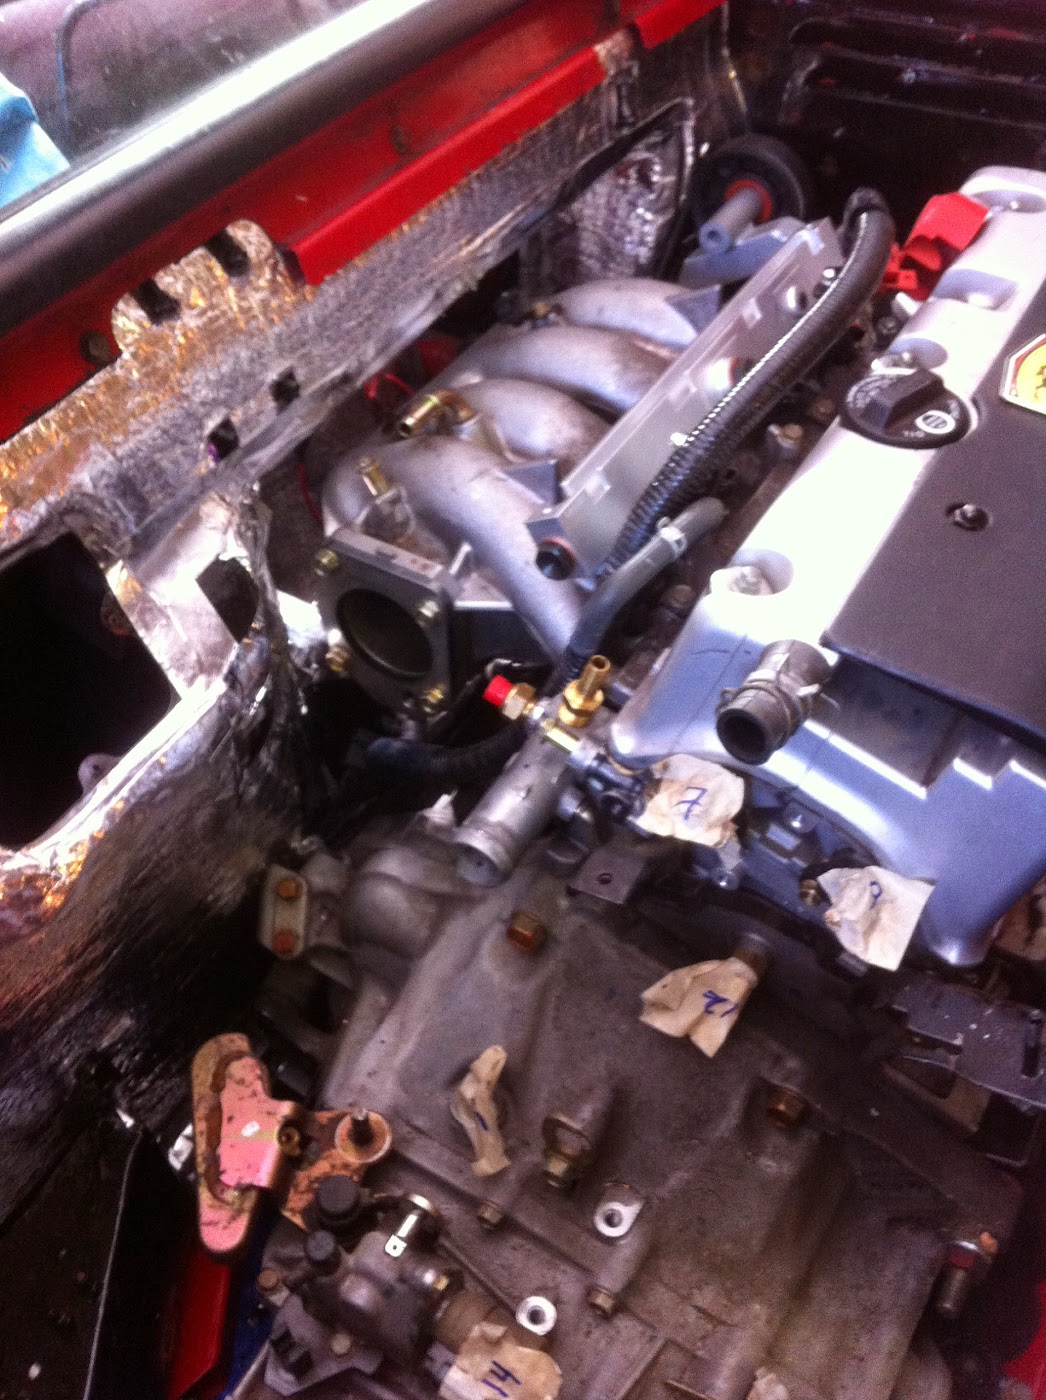
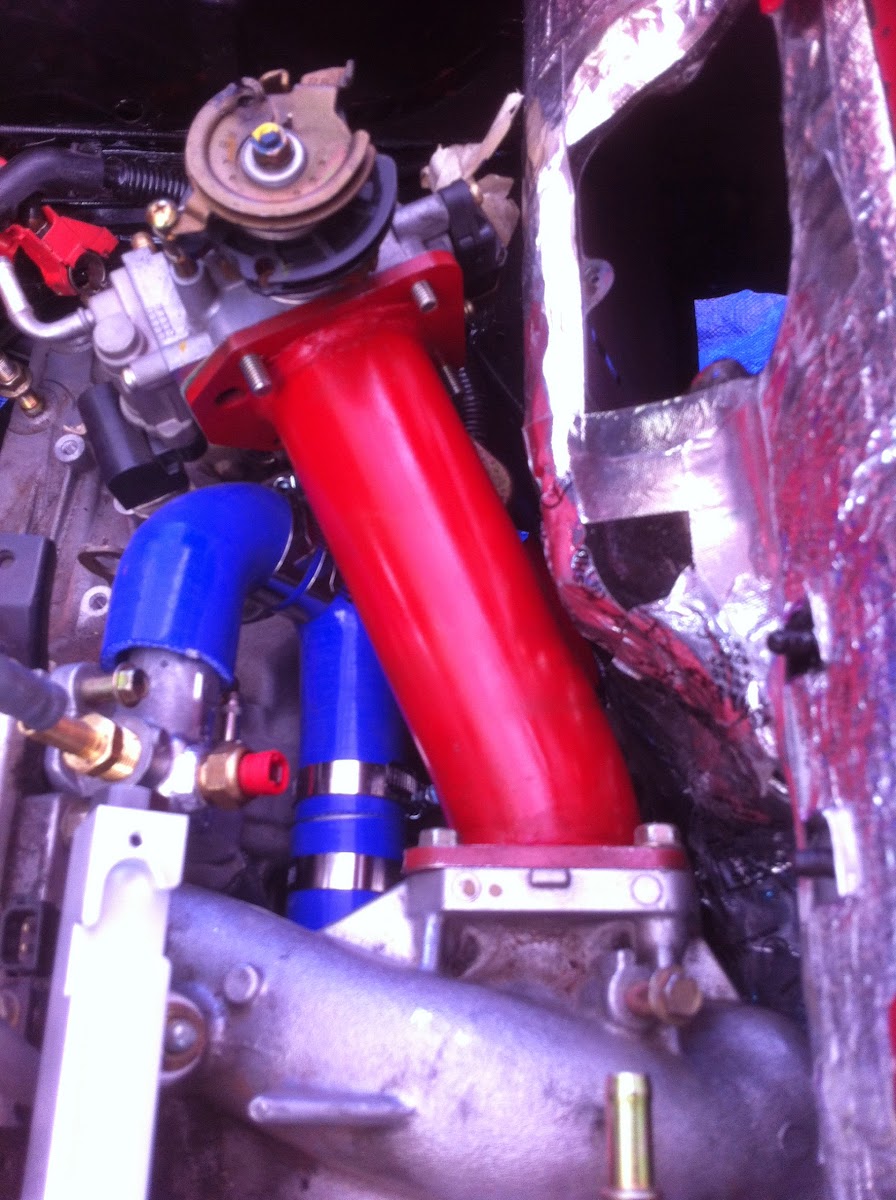
More done today on K20 install...
On a small roll here. I finished the custom throttle body neck:
Fit the steel tube to the custom inner and outer throttle body plates.
Tacked both into place and test fit the t-body

All done, painted and re-fitted

I did find a fitment issue that I *thought* I took care of already but did not:
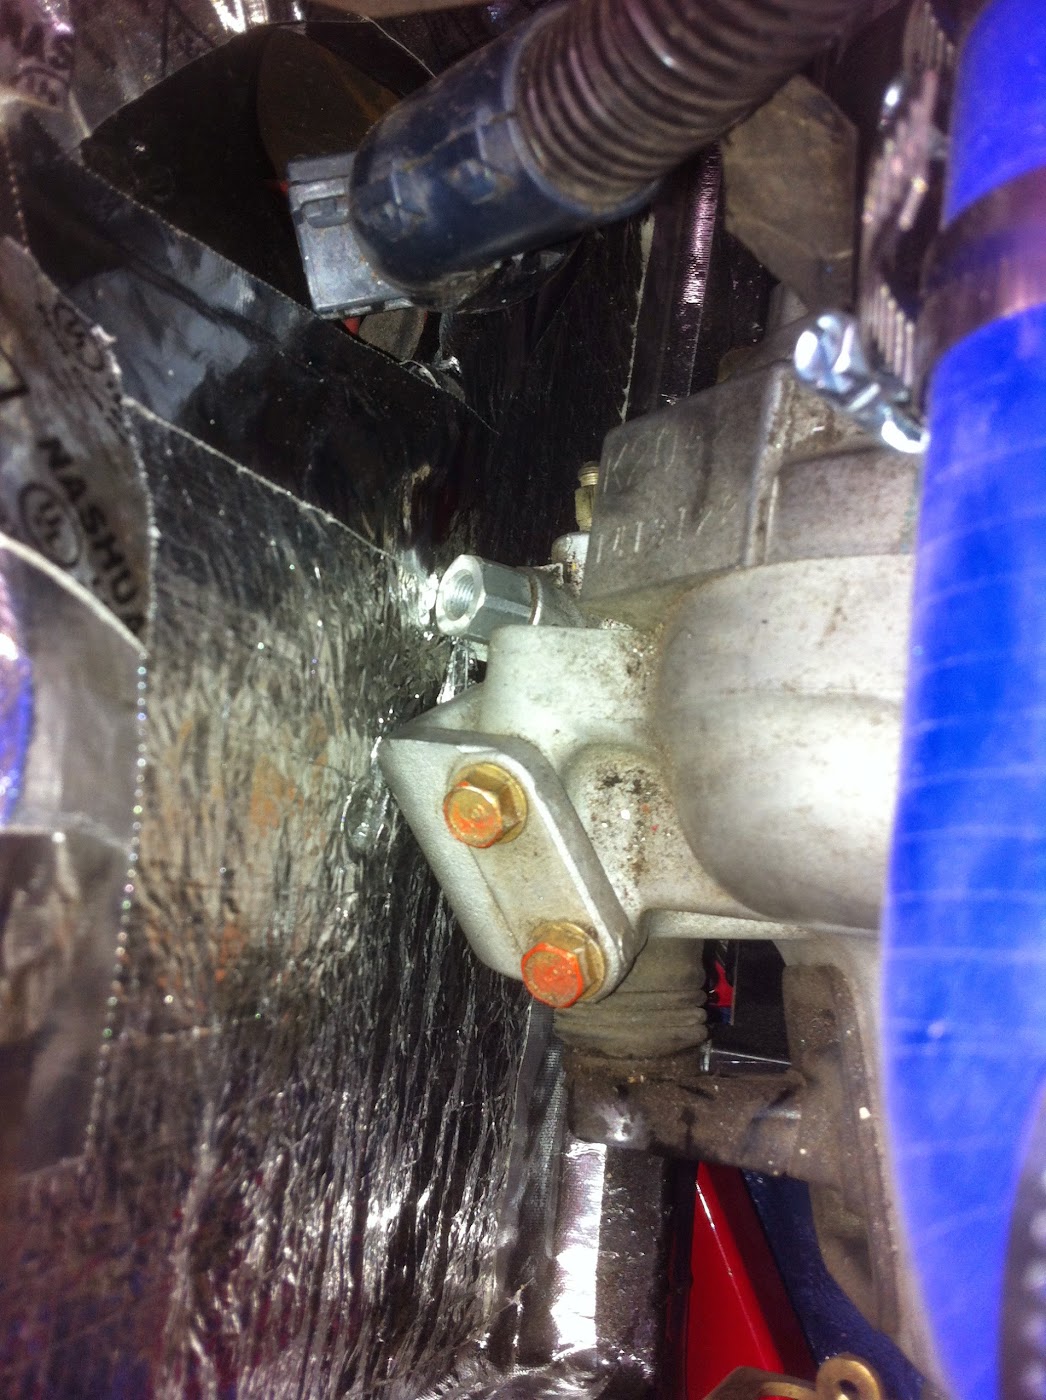
That is the slave cylinder for the clutch. The bracket and the clutch line fitting are resting against the inner firewall opposite of the gas tank I need to think about this one...:hmm:
On a small roll here. I finished the custom throttle body neck:
Fit the steel tube to the custom inner and outer throttle body plates.
Tacked both into place and test fit the t-body
All done, painted and re-fitted
I did find a fitment issue that I *thought* I took care of already but did not:
That is the slave cylinder for the clutch. The bracket and the clutch line fitting are resting against the inner firewall opposite of the gas tank
I need to think about this one...:hmm:fiatmonkey
Tim Hoover
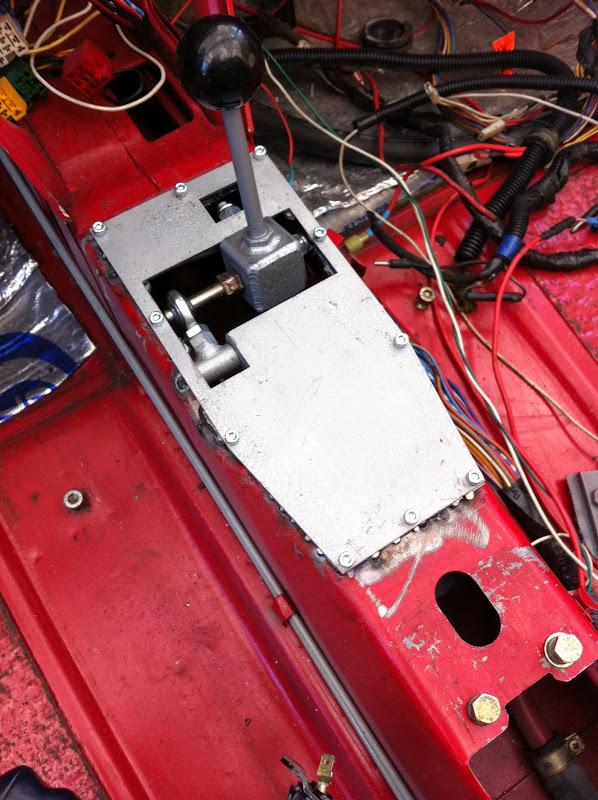
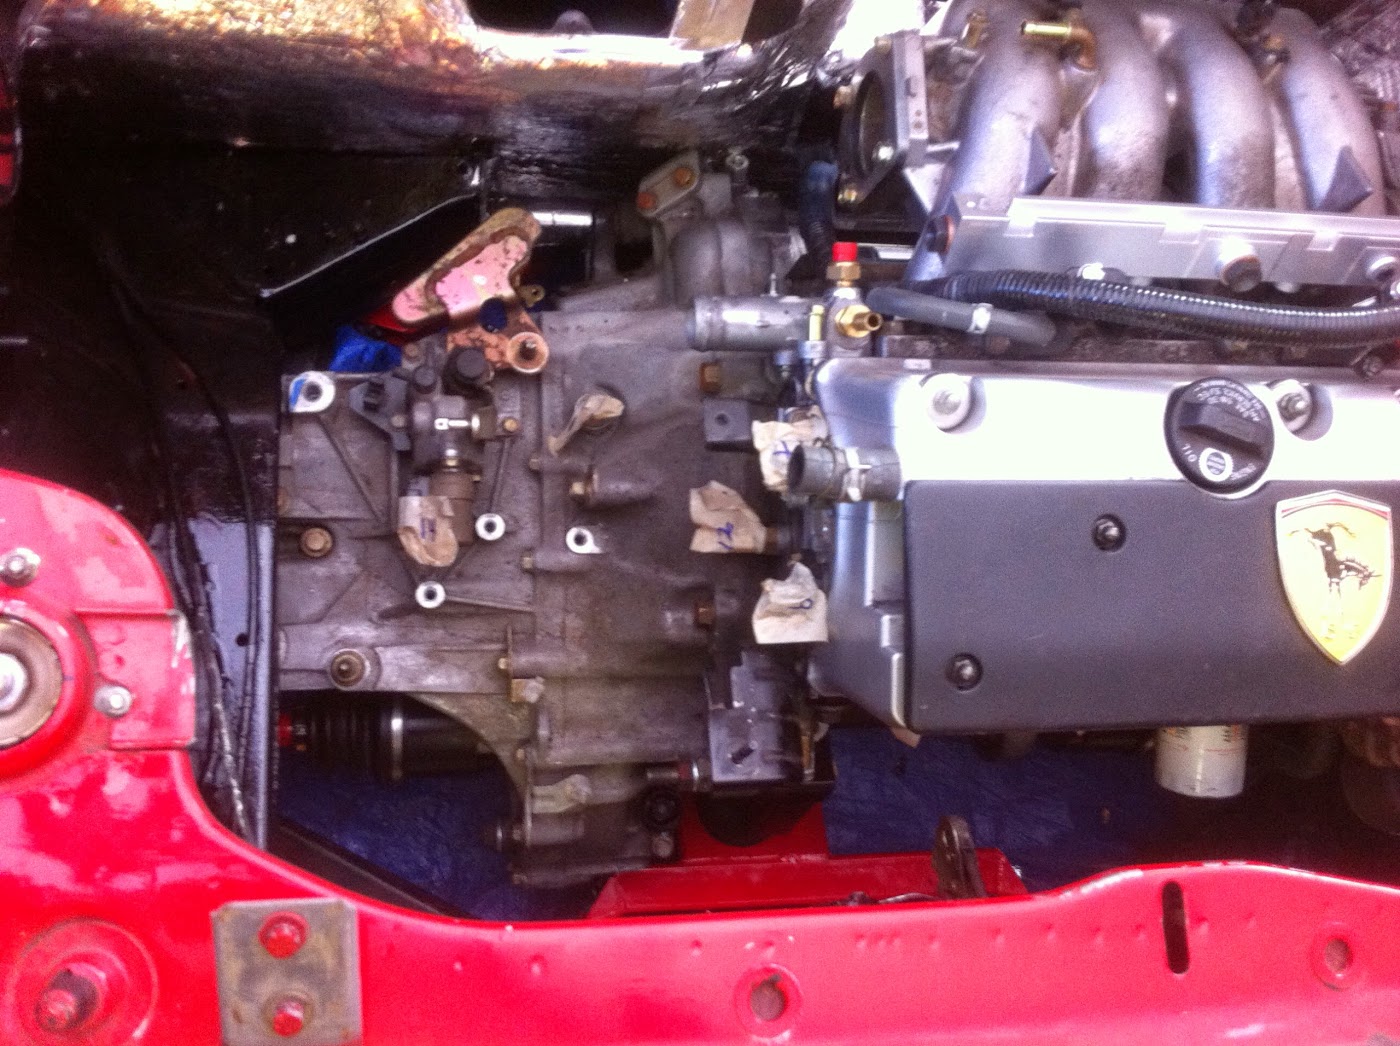
Even more k20 working...
I finally caught up on the shifter linkage. I have to say the kit Matt sold me has the coolest shifter ever.
The things holding this up were creating some custom brackets and modifying the arm-linkage that takes the two cables.
Welding and grinding...and a touch of paint.

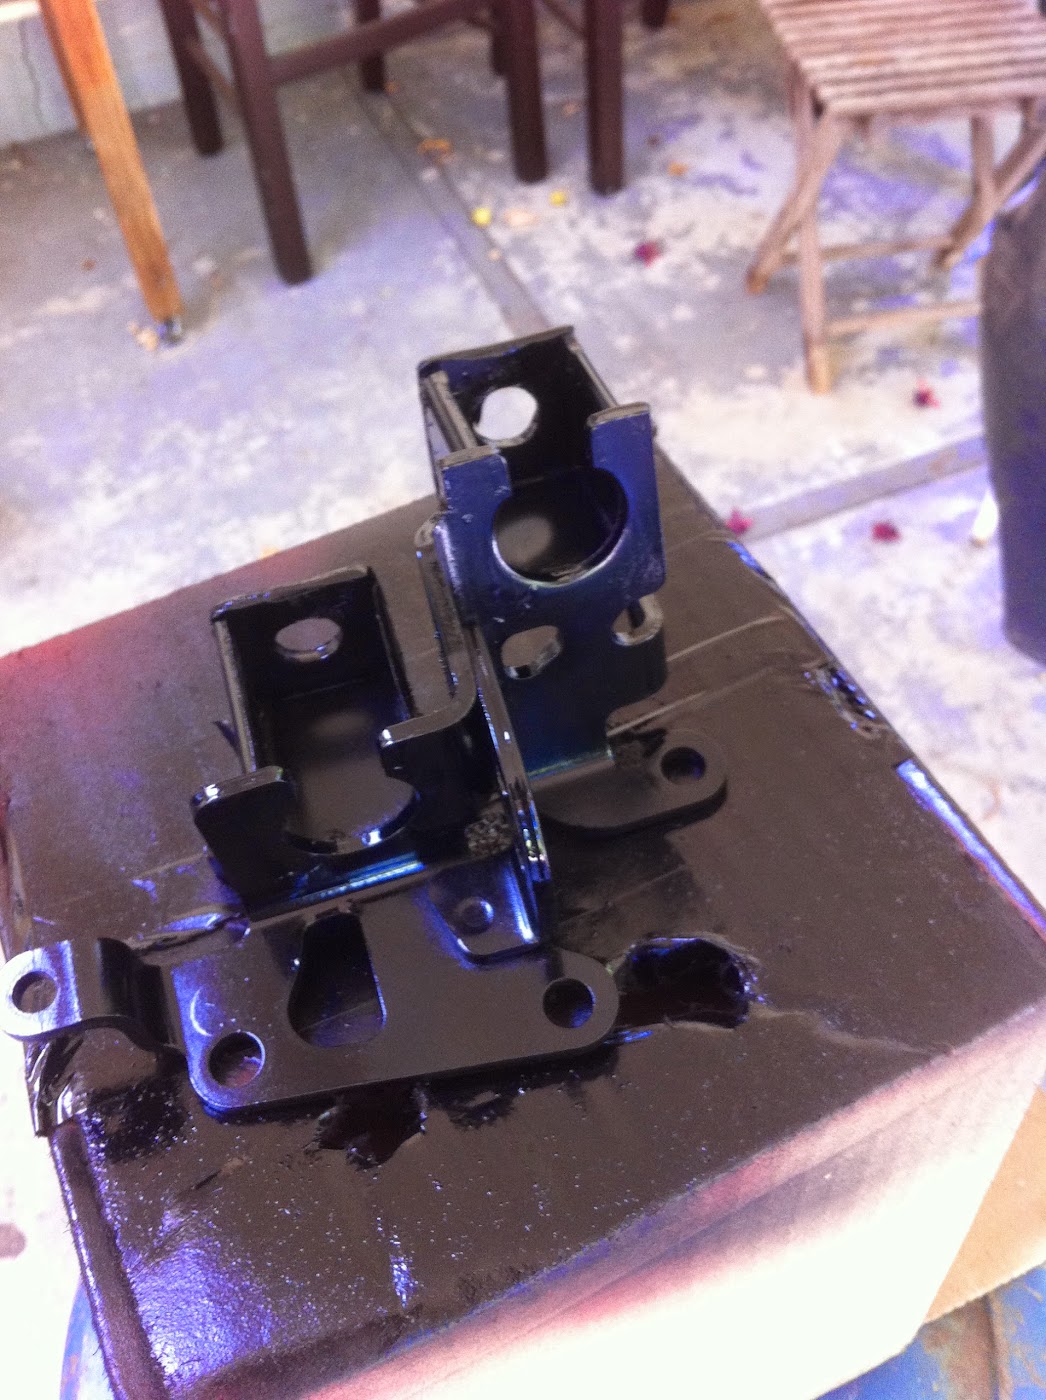
My welds on the shifter arm got a little messy (black paint covers up some...)
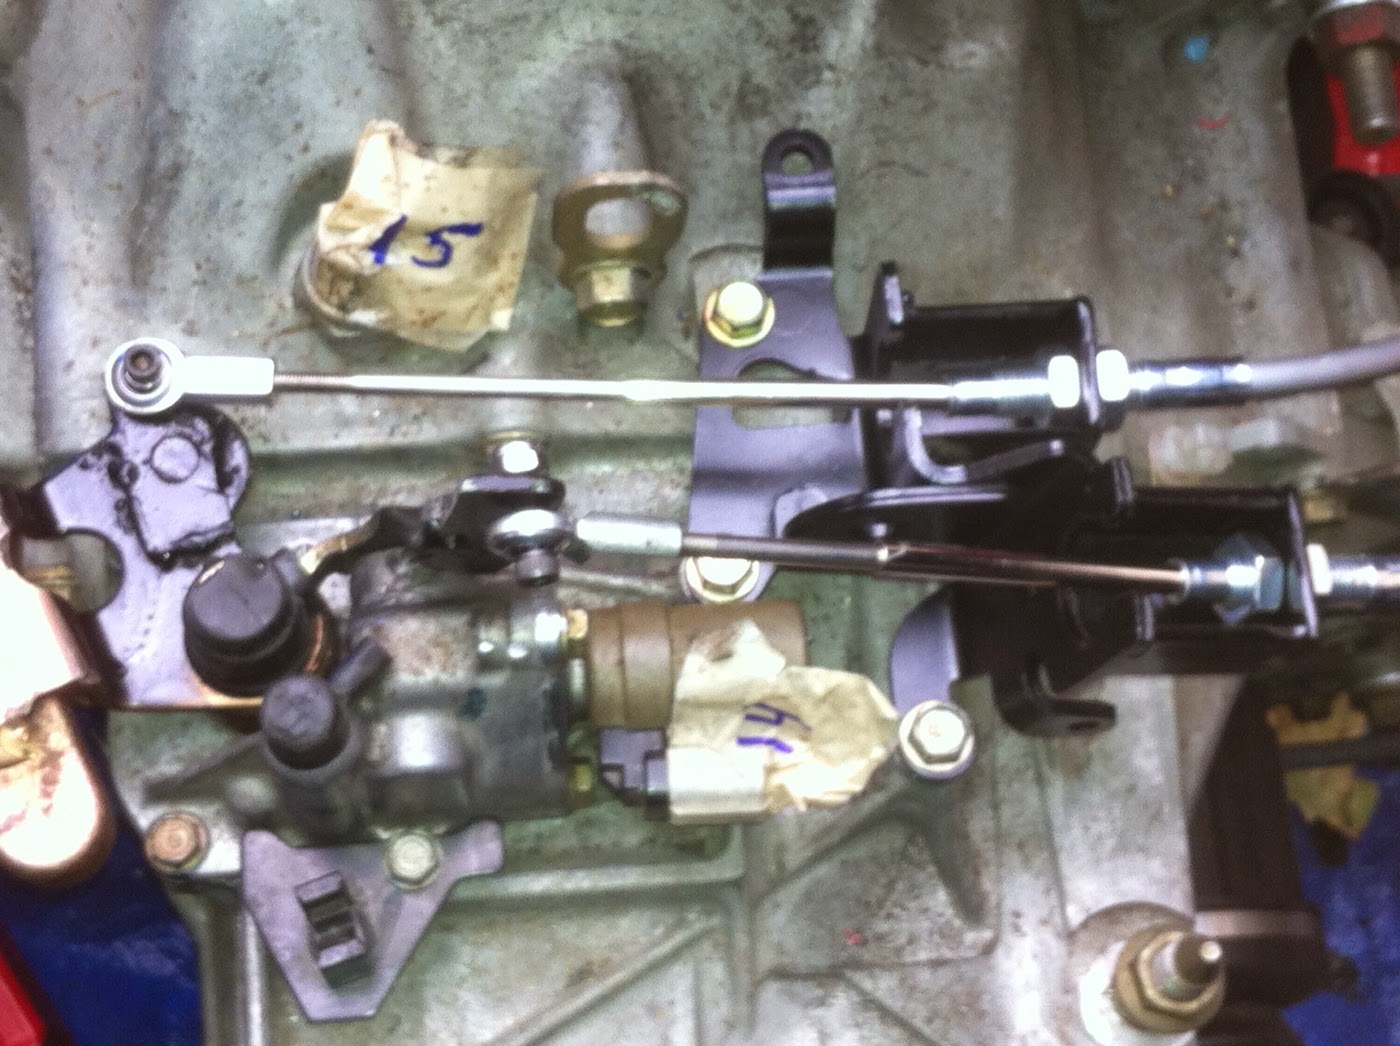
Coming along. One day at a time...
I finally caught up on the shifter linkage. I have to say the kit Matt sold me has the coolest shifter ever.
The things holding this up were creating some custom brackets and modifying the arm-linkage that takes the two cables.
Welding and grinding...and a touch of paint.
My welds on the shifter arm got a little messy (black paint covers up some...)
Coming along. One day at a time...
Last edited: