Looking good.... Did you find that you had to drill out some rivets in the rear sail chrome trim? You didn't mention doing so, but on a '74 there are three little rivets securing that trim strip.

You are using an out of date browser. It may not display this or other websites correctly.
You should upgrade or use an alternative browser.
You should upgrade or use an alternative browser.
The free X1/9 and what I'm doing with it post
- Thread starter bradartigue
- Start date
bradartigue
True Classic
Looking good.... Did you find that you had to drill out some rivets in the rear sail chrome trim? You didn't mention doing so, but on a '74 there are three little rivets securing that trim strip.
No rivets on the rear sail trim. The sill that it rides on has "outdents" that grab the plastic gasket upon which the chrome strip rides. The A pillar chrome trim is riveted.
OK, thanks.... and chalk up another small difference between the early cars and the later ones. There are just an amazing number of small and-not-so-small changes between '74 and '79 for ease of manufacture and maintenance.No rivets on the rear sail trim. The sill that it rides on has "outdents" that grab the plastic gasket upon which the chrome strip rides. The A pillar chrome trim is riveted.
bradartigue
True Classic
I was told by a 74 owner to be prepared for some raw knuckles but have found the access panels and other features in the 77 to make things quite accessible.
bradartigue
True Classic
Updated with pics of the engine out. Forty years of engine crud!
http://fiat.artigue.com/index.php/2017/02/12/1977-x19-project-journal-day-twelve/
http://fiat.artigue.com/index.php/2017/02/12/1977-x19-project-journal-day-twelve/
I'm going to disassemble the engine next, catalog the parts and send them off to the machine shop for an inspection and good cleaning.
http://fiat.artigue.com/index.php/2017/02/12/1977-x19-project-journal-day-twelve/
http://fiat.artigue.com/index.php/2017/02/12/1977-x19-project-journal-day-twelve/
I'm going to disassemble the engine next, catalog the parts and send them off to the machine shop for an inspection and good cleaning.
bradartigue
True Classic
When the block was on the ground I rotated the head until the stud came out. It was then a matter of pounding the stud back and forth and spraying with pblaster as more and more was exposed. The bolt was seriously stuck, it took about 30 blows with a 5# mall to get it out, and we had already applied about 200 pounds of breaking force and heat to it. I was worried about the head but it shows no signs of stress at all. Just a damn bolt!!
bradartigue
True Classic
Sunday's work...day 13:
http://fiat.artigue.com/?p=730&preview=true
After the machine shop takes a look I'll have a better idea of direction. If we're cutting bores it opens up some possibilities. If not then it opens up other possibilities. I have to get the CR up no matter what.
http://fiat.artigue.com/?p=730&preview=true
After the machine shop takes a look I'll have a better idea of direction. If we're cutting bores it opens up some possibilities. If not then it opens up other possibilities. I have to get the CR up no matter what.
bradartigue
True Classic
Finally got around to doing some work on the X1/9. I splurged on a $49 Harbor Freight electric impact wrench thinking if it didn't do the job (of removing the crank and aux shaft nut and bolt) then I'd return it. It worked perfectly, I should have bought one years ago. I didn't even need to block the crank or strap the aux shaft, it broke them off after a few impact slaps.

I disassembled the block entirely and cleaned it, then I cleaned it. Then, I cleaned it. Underneath 40 years of history was a block with half the original paint and half not (guess which didn't have it?). I never noticed that FIAT also seems to have painted the interior of the block, I have no idea why they would other than to prevent rust during storage. Whatever they use is durable, it remains perfectly intact.
The block is otherwise, well, a block. The bores look good, not even a slight ridge anywhere, and no gouging. Some glaze exists that I have to hone out. It appears that two bearings were changed out at some point in time, though it also appears the block was never opened up, so I'll have to do some research in files as the previous owner kept everything.
In case you're wondering here is the original FIAT color on a block:

And finally, the side with no paint:

I disassembled the block entirely and cleaned it, then I cleaned it. Then, I cleaned it. Underneath 40 years of history was a block with half the original paint and half not (guess which didn't have it?). I never noticed that FIAT also seems to have painted the interior of the block, I have no idea why they would other than to prevent rust during storage. Whatever they use is durable, it remains perfectly intact.
The block is otherwise, well, a block. The bores look good, not even a slight ridge anywhere, and no gouging. Some glaze exists that I have to hone out. It appears that two bearings were changed out at some point in time, though it also appears the block was never opened up, so I'll have to do some research in files as the previous owner kept everything.
In case you're wondering here is the original FIAT color on a block:
And finally, the side with no paint:
bradartigue
True Classic
Check here where I have some close ups of the block before I cleaned it:
http://fiat.artigue.com/index.php/2017/02/14/1977-x19-project-journal-day-thirteen/
and here you can see the pistons before they were removed. They appear to have small cutouts to me, but maybe the euro pistons had smaller cutouts? I may still switch pistons on this mama...
http://fiat.artigue.com/index.php/2017/02/14/1977-x19-project-journal-day-twelve/
bradartigue
True Classic
Can I rant for a moment? Because to date I've been generally impressed at how the X1/9 is put together. And then last night decided to remove the master cylinder and slave cylinder. Who - in the hell - decided this was a good idea? I decided based on reading here (thank you all) to remove the steering column and pedal assembly, because it's too easy not to, but still - what a goofy layout. Saved a few bucks in linkages I guess. And so the rant ends.
I spent more time with the car last night than I have in a very long time, 8 hours in fact. I removed or isolated every single thing that would interfere with the painting, or things I don't want painted, which includes all of those rubber plugs and little things screwed in here and there. I also removed the rear brakes and lines. In the cowling I removed the brake and clutch reservoirs and the miles of hose and the wiper assembly and motor. I removed the hood clasp and the battery wires. Inside I removed the steering, door panels and door "stuff", and undented the floor. All that remains in the rear is the single brake line and the clutch line, both of which I'll have to tie out of the way (easy enough) during painting. In the frunk all that is left is the long wiring along the driver's side, which I may isolate and wrap in tape, it looks daunting to remove. The final move of the evening was to test-sand the trunklid, which reminded me how little paint FIAT/Bertone actually used on these cars.
Some pics:
First, the interior. I don't know what the Bertone painter laid on the metal brace above the center vents, but it remains in pristine white primer. The floor covering cracked when I unbent it, reveraling much the same, unrusted white primed metal. I have no doubts now why floorboards rusted out - they didn't bother to paint before applying the sound proofing, locking in any moisture that was there.

A first for me on a FIAT - door panels that have never been removed. The doors have the original black backing and all of the tabs and cardboard is in excellent condition. This is what garage storage will do for you:

I also found that although my car had what appears to be a test pipe it was a non-catalyst car to begin with; I'm guessing FIAT used the forthcoming catalyst exhaust with no catalyst? Seems a bit odd given that other FIATs had converters back then.

And finally, anyone care to guess what this was for? A quality control sticker! Maybe that's why it didn't rust, it was the quality control model for that period of assembly...I'm not really sure what it is, just a "statistico" sticker of some sort.

I spent more time with the car last night than I have in a very long time, 8 hours in fact. I removed or isolated every single thing that would interfere with the painting, or things I don't want painted, which includes all of those rubber plugs and little things screwed in here and there. I also removed the rear brakes and lines. In the cowling I removed the brake and clutch reservoirs and the miles of hose and the wiper assembly and motor. I removed the hood clasp and the battery wires. Inside I removed the steering, door panels and door "stuff", and undented the floor. All that remains in the rear is the single brake line and the clutch line, both of which I'll have to tie out of the way (easy enough) during painting. In the frunk all that is left is the long wiring along the driver's side, which I may isolate and wrap in tape, it looks daunting to remove. The final move of the evening was to test-sand the trunklid, which reminded me how little paint FIAT/Bertone actually used on these cars.
Some pics:
First, the interior. I don't know what the Bertone painter laid on the metal brace above the center vents, but it remains in pristine white primer. The floor covering cracked when I unbent it, reveraling much the same, unrusted white primed metal. I have no doubts now why floorboards rusted out - they didn't bother to paint before applying the sound proofing, locking in any moisture that was there.
A first for me on a FIAT - door panels that have never been removed. The doors have the original black backing and all of the tabs and cardboard is in excellent condition. This is what garage storage will do for you:
I also found that although my car had what appears to be a test pipe it was a non-catalyst car to begin with; I'm guessing FIAT used the forthcoming catalyst exhaust with no catalyst? Seems a bit odd given that other FIATs had converters back then.
And finally, anyone care to guess what this was for? A quality control sticker! Maybe that's why it didn't rust, it was the quality control model for that period of assembly...I'm not really sure what it is, just a "statistico" sticker of some sort.
Huey
True Classic
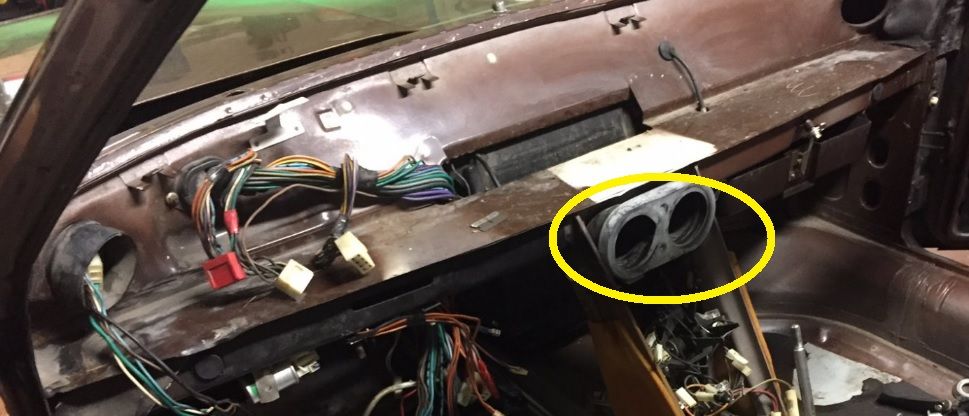
I've been following your thread, nice job. You will have a very nice car for very little money when you are finished. I had a '75 years ago with the same dash layout and seeing yours with the dash removed, I can think of some pretty cool custom fabrications if one were so inclined and skilled. For instance, this would make a great spot for some custom gauges
motoTrooper
True Classic
Excellent progress and documentation! Yes by all means preserve that brown paint job with an awesome clearcoat which then is painted over with a lovely lime green or fly yellow or metallic charcoal grey!
bradartigue
True Classic
Excellent progress and documentation! Yes by all means preserve that brown paint job with an awesome clearcoat which then is painted over with a lovely lime green or fly yellow or metallic charcoal grey!
Everyone has an opinion in my house and among my friends as to what a good color would be - and no one says "hey keep the brown." lol - it's actually not a terrible color but it really is just brown. This is too much work for a brown car!!!!
As to modifications it will be almost entirely stock; I think they did it right the first time with the exception perhaps of the bumpers.
rocco79/138
True Classic
These are the pistons I got that were supposed to be increased CR. Look very similar to your stock 1300 pistons. The 1500 had bigger cut IIRCCheck here where I have some close ups of the block before I cleaned it:
http://fiat.artigue.com/index.php/2017/02/14/1977-x19-project-journal-day-thirteen/
and here you can see the pistons before they were removed. They appear to have small cutouts to me, but maybe the euro pistons had smaller cutouts? I may still switch pistons on this mama...
http://fiat.artigue.com/index.php/2017/02/14/1977-x19-project-journal-day-twelve/
.

Regards

bradartigue
True Classic
You picture is just a gray bar  can you upload again?
You are correct, the 8" from the lip of the dash to the edge of the cowling are comically complex. It took me less time to remove the engine and transmission than it did to remove all the stuff on either side of the windshield!
can you upload again?You are correct, the 8" from the lip of the dash to the edge of the cowling are comically complex. It took me less time to remove the engine and transmission than it did to remove all the stuff on either side of the windshield!
fiatfactory
Steve Cecchele
These are the pistons I got that were supposed to be increased CR. Look very similar to your stock 1300 pistons. The 1500 had bigger cut IIRC
.View attachment 1741
Regards
Those are stock euro 1300 pistons 34.7mm CH with a tiny 0.6mm pimple in the centre, with the euro head that's a 9.2:1 static compression engine in a 1300, if used in a 1500 they will definitely bump the static CR...
Can't really tell what the CH of the pistons in Brad's motor are, but with the decompression recess head they are max 8.5:1 static CR...
1500 pistons have a large cast in flycut, here's a comparison between small and large valve flycuts, pretty easy to see the difference.

Pistons also come in other compression heights in the small flycut style ranging from 34.15 all the way to 34.9mm.
Highest compression OE pistons for the 1300 are like these, 35.3CH and a 1.6mm half dome.


in a 1300 with a euro head these give 9.9:1 static, PM if you want a set of these Brad to bump the static up where it makes a real difference to performance, I have a few left in 87.0 and 86.8 and a couple of sets of 86.4.
SteveC