1974 128 SL Coupe build project

Heater core / box / fan installed, and the dashboard

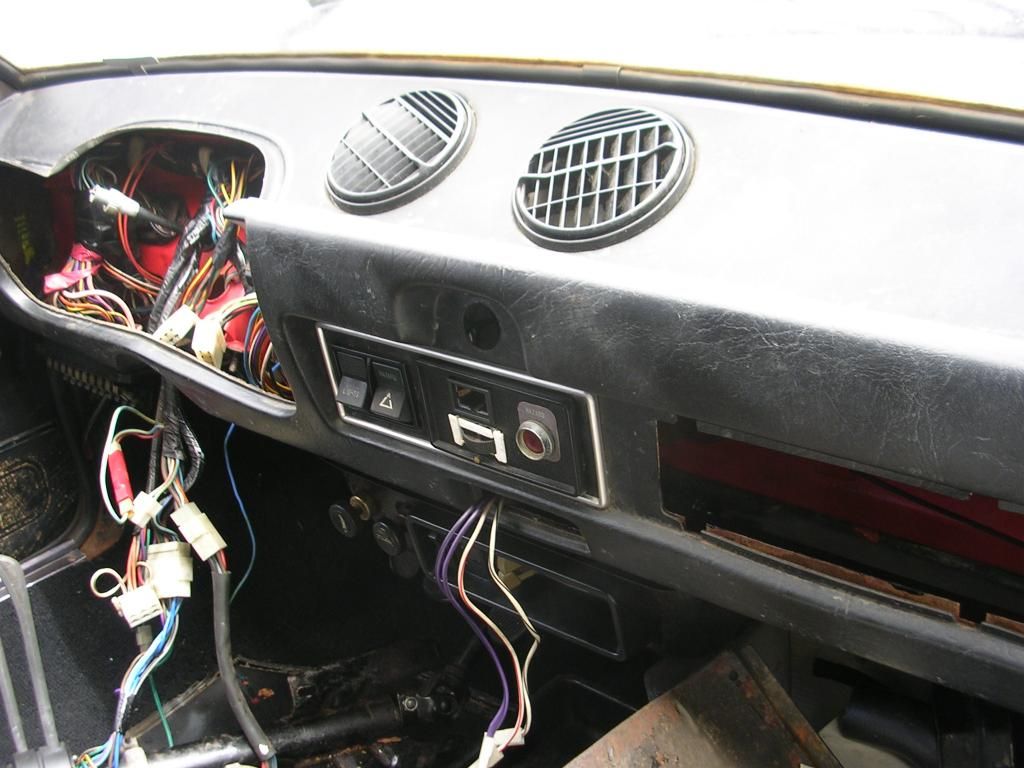
Heater - vent control / choke - hand throttle panel fitted, lubricated and functional. Underhood heater core / fan housing re-installed; Duct doors, new heater valve working smoothly.

Dashboard fitted, headlight & hazard switches reconnected. Refurbished 3 way rocker switch for blower fan.

New battery placed, no obvious open circuits. Blower working, high and low. Hazard light relay & lamp functioning, illuminated 1 of 4 signals. All four headlights glowing....so far optimistic on the wiring.

Test fit instrument cluster, removed back to workbench for Q/A. Threaded new speedo drive cable through firewall.

 
Instrument cluster, clutch cable

New clutch cable installed. Reviewed all instrument cluster lamps, power and ground pathways. Water temp and fuel gauges now functioning with some attention. Need to pull turn signal relay and resolve connectors.

Acquired cast alloy oil pan from Albert A *thanks* great Xweb forum member.


Had no idea this was your thread!!....and that ive been faithfully following it.Keep it going!!....:italia:
 
14x6 BWA Sportstars

Wheels forthcoming...from Poland.


Miro says they were test fitted to his friend's group 2 race car, so we think the backspace will be correct.

 
Lights, turn flasher, Alquati pan arrival

Outside the car, started with little illumination other than headlamps and brakes. Biggest problem was bulb socket oxidation, dead bulbs, and weak continuity. Initially thought I had a bad flasher, but reverted to the OEM unit once the sockets were corrected. Most of the grounds were intact, though a few spade connections required cleaning. Running lamps were vexing, fortunately the 1974 owners manual has a superior and accurate wiring diagram, yielding the discovery that the running lights are on two circuits for redundancy.

Side markers also glowing nicely now, new 168's. License plate lamp sockets also oxidized now functioning, rewired one ground.

Backup lamp socket was super oxidized. After much scraping, carborundum paper, and test lamp QA, determined the failure was between the positive spade, and the copper spring to the bulb base. Drilled out the rivets in the socket base to find the corrosion between the little spring and spade. Resolved and re-riveted.

Cleaned up all contacts on the fuse block.

Alquati oil pan came from AlbertA, superbly packed and protected from Texas.

Hoping to hear back from Jeff Stich on the transaxle arrival, the gating factor now to a running SL Coupe.


And a 3D model just arrived, 1975 Coupe, a rolling reference library to guide proper reassembly of the '74

 
Awesome in every...

Awesome work in every arena Jim!
So happy to see you take this beyond anything I envisioned
with the add'l upgrades you're doing.

Electrical resolution is SOP for long standing cars.
Not that tough...just time consuming & often fiddly process.
Glad the supplied documentation is helping.
And a "full-service spare" at the ready for backup!

Checking Koni settings before assembly tells me you're
careful & methodical...assume nothing with parts or cars.

Only issue I see is your hotrod SL might make stock SL seem a bit weak.
I'm attempting to cope with that on stock SplitPea vs hotrod Sedan.
So far...Sedan is winning. Power corrupts...
 
You will like the single DCNF I had trouble getting the transition from idle to primary circuit smooth but I used a 40-80 A16 cam. It was fast for an X with that setup.
 
Next steps

Jeff Stich plans to ship the 5 speed transaxle today (bravo Jeff) in a newly constructed proper crate. Should arrive toward the end of the work week. Expect to mate it to the block without the head / studs, and slide it in then raise into place. Head studs and head will install with block in the car.

Once the wheels are back on, rotate the car for access to the rear brake cylinders, leaf spring / rear shocks, fuel pump and gas tank.

Appreciate the feedback so far. This will be my first experience with a DCNF. Linkage appears to be straightforward, and per Chris and a separate post by SteveC, it should be good.
 
Why the electric fuel pump was abandoned

Definitely helpful to study wiring diagrams (thanks again to MikeM for the stellar documents library with the car): there is a single in line fuse located adjacent to the steering column. This is part of the fuel delivery system. Inspection revealed oxidized fuse ends, fuse contacts, and spade connectors. Now resolved, this may have been the reason a perfectly good electric pump was mothballed in favor of a mechanical unit. The guts of the little fuse holder can be disassembled and cleaned: the spade has an integrated spring to keep pressure on the fuse contacts.


Rear lamp lenses, all reinstalled now that illumination functions.


Alquati oil pan, installed

A very nice unit, even the windage tray is cast aluminum. Installation required minor trimming of the oil return tube, and some care re-fitting the bolts (longer fasteners and nuts used on the front of the pan).

Instruments cluster reinstalled, deleted foggy gauge lenses. Steering column surround re-installed, tricky to get it interference free.

Fed ex tracking says the transaxle arrives Friday.

 
instrument lens delete, new shifter boot

Nice and clear without the foggy lenses:


Torn original shifter boot removed. New correct boot installed, from FiatPlus. Cleaned the nylon mechanism, looks to be functional.


Remaining dash tasks: re-affix turn flasher, dashboard lamp, and build a cover for the radio delete section.

 
Transaxle mating to block

Yugo GVX 5 speed received from Jeff Stich, working on integrating to the 1500 block.


Lightened flywheel w/ ARP fasteners


Almost there

 
Motor 'In

EPA information from the era:


Nice to have a solid platform


Second pass at the transaxle mating proved fruitful with an X1/9 output shaft as the alignment tool. Restored sheetmetal in place, with Valeo clutch, pressure plate, lightened flywheel. It all fits. Helicoiled one stripped thread on the starter. Rolled the unit under the car, with jack and come along as a lift. Chased threads on the frame crossmember mounts. Took about three tries to get the snail mount into the receiver buckets.

The motor and transaxle are installed. 5 speed GVX fit right in to this SL Coupe, with no modifications. Jeff Stich was correct on the compatibility information, as was Matt on the flywheel and clutch selection.

 
Coupe vs. Sedan/Wagon

Does the Sl have a front swaybar? Will it interfere with the 5-speed?

The 128 SL & 3P Coupes don't use a front swaybar like their 128 Sedan/Wagon siblings. Instead, they use a front radius rod set-up similar to the X1/9. Having no swaybar means it won't interfere with the 5th gear extension housing on this trans (which is the problem with installing the 5-speed in a 128 Sedan/Wagon). The radius rods should be (factory) set far enough apart at the front to not cause any interference with the trans.

This is why, when it recently became available, I offered the Yugo 5-speed to Jim vs. the Yugo 4-speed he'd bought from me just a few months earlier. He still gets the long-legged Yugo 3.76 final drive ratio he wanted, but now also another "overdrive" gear on top of that for relaxed highway cruising (his 1500 should be able to handle it just fine). An added bonus for me is that the Yugo 4-speed that didn't get shipped to Jim will instead go into my 128 Wagon. Win-win! :headbang:

Jim,
Just curious - was there any interference with the upper mounting flange on the 5th gear housing (where the former Yugo trans-end mounting bracket would've bolted up to the top/outer end of the trans case) & the Coupes' driver-side frame rail (ie: the arch between the engine bay & the driver-side wheel-well)?
 
transaxle / frame rail fit

Jeff -

No interference observed between the upper mounting flange on the 5th gear housing & the Coupes' driver-side frame rail! So far so good, standby for further reports as the axles and head are installed.

Performed the rudimentary shift test before the install with vise grips on the actuator mechanism, all good. Even if the trans has to come back out, it'll be worth it as you say with the optimal ratios for performance plus overdrive.
 
Transaxle interference

Further to Jeff's question, the Yugo transaxle mounting tab does touch the chassis, though it will be easy to resolve.


DCNF looks serviceable.


Pleasing view from below


Back
Top