
Dan Sarandrea (Phila)
Waitin' On Parts...
Here's a technique for installing front control arm rubber bushings that uses one repurposed plumbing connector and tools, equipment and supplies that most home mechanics will already have.
1. Start with your control arm removed from the car. This one has been bead blasted.

2. Since the bushings are dumbell- or hourglass-shaped you have to cut off one end before you remove the old one. For my bench and vise setup, I found it best to cut off the end that faces the attached strut rod. The picture below shows the old bushing with the end cut off.
.jpg")
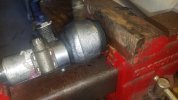
3. Next use sockets as press tools and a bench vise as a press to force the old bushing out of the arm. The smaller socket applies force to the bushing and the bigger socket provides a hollow space or pocket to allow the bushing to come out the other side. It takes a lot more force to remove the old bushing than to install the new---I was using a cheater on the bench vise's forcing screw.

4. Here's the bushing after being forced out--you can see where one end was cut to allow removal. In this pic I am using a deep well socket as a receiver and a 9mm as a pusher to push out the inner sleeve.

5. Here's what I used to install. Silicone spray***, two hose clamps, smallest shielded coupler they had at Home Depot (less than $10), and a yellow wire nut.
Notes:
a. The hose clamps that come with the shielded coupler don't have enough tightening range, so their retaining rivets have to be drilled out so you can remove them from the metal of the coupler and substitute your own. IIRC it has four rivets, two per clamp.
b. The rubber of the coupler is not used.
c. The coupler was used for its spring steel shield---if you have comparable material laying about, you don't even need to go buy the coupler.


5. Prep the control arm by cleaning out the hole that will receive the bushing and liberally coat with silicone spray*** or other rubber-friendly lube***.
6. Set up your fixture by putting the hose clamps around the spring steel shield and tighten to reduce its diameter. When you get it near the size of the bushing, spray the inside of the sleeve and the busing with silicone*** and place the bushing inside the cylinder of the sleeve.

7. Flip the loaded cylinder on end, bushing down. Place a socket inside the open end and press down to make sure the end of the bushing and the end of the sleeve are flush. Once the bushing, the sleeve, and the bottom hose clamp are all flush to the table, remove the socket. Now tighten the clamps alternately keeping the bottom clamp flush with the table, sleeve end, and bushing. The other clamp should be positioned on the sleeve to exert pressure on the upper end of the bushing. Flip it over every so often to check your progress. Eventually it will look like this.
.jpg")
.jpg")
8. Now that the squished bushing is pretty close to the diameter of the opening in the control arm, it will press in pretty easily. Spray some more silicone*** and press as pictured. If you are using a socket as I am in the pic, I would recommend oreienting the socket so the square end is pressing against the bushing and the open end is against the vise jaws. That way, the press force is applied to a larger surface area of the rubber bushing.


9. Once you get to this point where the bushing bottoms out against the vise jaw, reset the vise and use the big socket to give the new bushing the space it needs to pop out the other side of the control arm, and a slightly longer pusher socket to get it that last 1/2 inch or so. (Sorry, no pic of the above step.)

10. Here's a pic of the spring steel sleeve after it got the job done.
.jpg")
11. Now it's time to press in the steel tube. I used a yellow wire nut as a taper to open up the hole in the center of the bushing so that the steel tube can slide in easily. The steel sleeve acts as its own pusher. Don't forget the silicone spray***. When the yellow wire nut is all the way thru and hitting the other jaw of the vise, reset the vise and add a socket to provide the needed space to let the yellow wire nut pop out the other side of the bushing.


***Reference to silicone spray and lube: Doug (rx1900) pointed out in the post below that the best practice for rubber bushing installation is to use a lubricant such as diluted dish soap that will dissipate quickly rather than persist, as a silicone spray or grease would. The idea is that we want the outer and inner surfaces of the bushing to tightly grip their metal mating surfaces so that any movement taking place is via rubber flexion and NOT the rubber sliding in or on the metal surfaces. thanks to Doug for pointing this out
1. Start with your control arm removed from the car. This one has been bead blasted.
2. Since the bushings are dumbell- or hourglass-shaped you have to cut off one end before you remove the old one. For my bench and vise setup, I found it best to cut off the end that faces the attached strut rod. The picture below shows the old bushing with the end cut off.
3. Next use sockets as press tools and a bench vise as a press to force the old bushing out of the arm. The smaller socket applies force to the bushing and the bigger socket provides a hollow space or pocket to allow the bushing to come out the other side. It takes a lot more force to remove the old bushing than to install the new---I was using a cheater on the bench vise's forcing screw.
4. Here's the bushing after being forced out--you can see where one end was cut to allow removal. In this pic I am using a deep well socket as a receiver and a 9mm as a pusher to push out the inner sleeve.
5. Here's what I used to install. Silicone spray***, two hose clamps, smallest shielded coupler they had at Home Depot (less than $10), and a yellow wire nut.
Notes:
a. The hose clamps that come with the shielded coupler don't have enough tightening range, so their retaining rivets have to be drilled out so you can remove them from the metal of the coupler and substitute your own. IIRC it has four rivets, two per clamp.
b. The rubber of the coupler is not used.
c. The coupler was used for its spring steel shield---if you have comparable material laying about, you don't even need to go buy the coupler.
5. Prep the control arm by cleaning out the hole that will receive the bushing and liberally coat with silicone spray*** or other rubber-friendly lube***.
6. Set up your fixture by putting the hose clamps around the spring steel shield and tighten to reduce its diameter. When you get it near the size of the bushing, spray the inside of the sleeve and the busing with silicone*** and place the bushing inside the cylinder of the sleeve.
7. Flip the loaded cylinder on end, bushing down. Place a socket inside the open end and press down to make sure the end of the bushing and the end of the sleeve are flush. Once the bushing, the sleeve, and the bottom hose clamp are all flush to the table, remove the socket. Now tighten the clamps alternately keeping the bottom clamp flush with the table, sleeve end, and bushing. The other clamp should be positioned on the sleeve to exert pressure on the upper end of the bushing. Flip it over every so often to check your progress. Eventually it will look like this.
8. Now that the squished bushing is pretty close to the diameter of the opening in the control arm, it will press in pretty easily. Spray some more silicone*** and press as pictured. If you are using a socket as I am in the pic, I would recommend oreienting the socket so the square end is pressing against the bushing and the open end is against the vise jaws. That way, the press force is applied to a larger surface area of the rubber bushing.
9. Once you get to this point where the bushing bottoms out against the vise jaw, reset the vise and use the big socket to give the new bushing the space it needs to pop out the other side of the control arm, and a slightly longer pusher socket to get it that last 1/2 inch or so. (Sorry, no pic of the above step.)
10. Here's a pic of the spring steel sleeve after it got the job done.
11. Now it's time to press in the steel tube. I used a yellow wire nut as a taper to open up the hole in the center of the bushing so that the steel tube can slide in easily. The steel sleeve acts as its own pusher. Don't forget the silicone spray***. When the yellow wire nut is all the way thru and hitting the other jaw of the vise, reset the vise and add a socket to provide the needed space to let the yellow wire nut pop out the other side of the bushing.
***Reference to silicone spray and lube: Doug (rx1900) pointed out in the post below that the best practice for rubber bushing installation is to use a lubricant such as diluted dish soap that will dissipate quickly rather than persist, as a silicone spray or grease would. The idea is that we want the outer and inner surfaces of the bushing to tightly grip their metal mating surfaces so that any movement taking place is via rubber flexion and NOT the rubber sliding in or on the metal surfaces. thanks to Doug for pointing this out
Attachments
Last edited:
