Let's Print some X1/9 parts!

Anyone interested in printing a part for me?

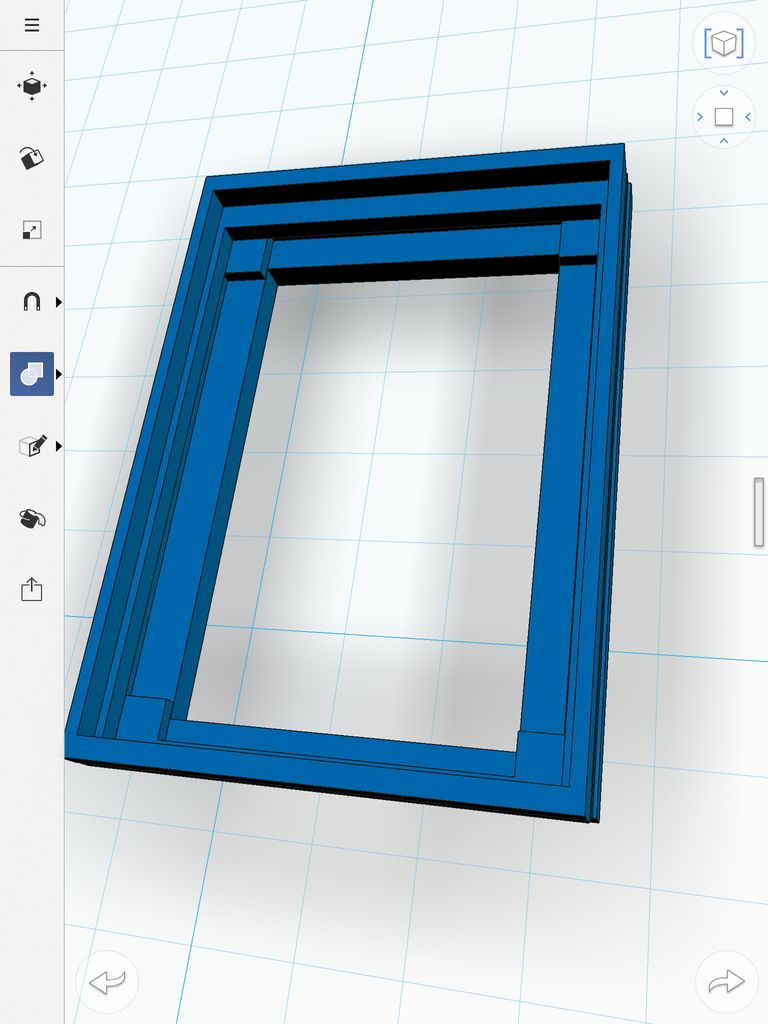
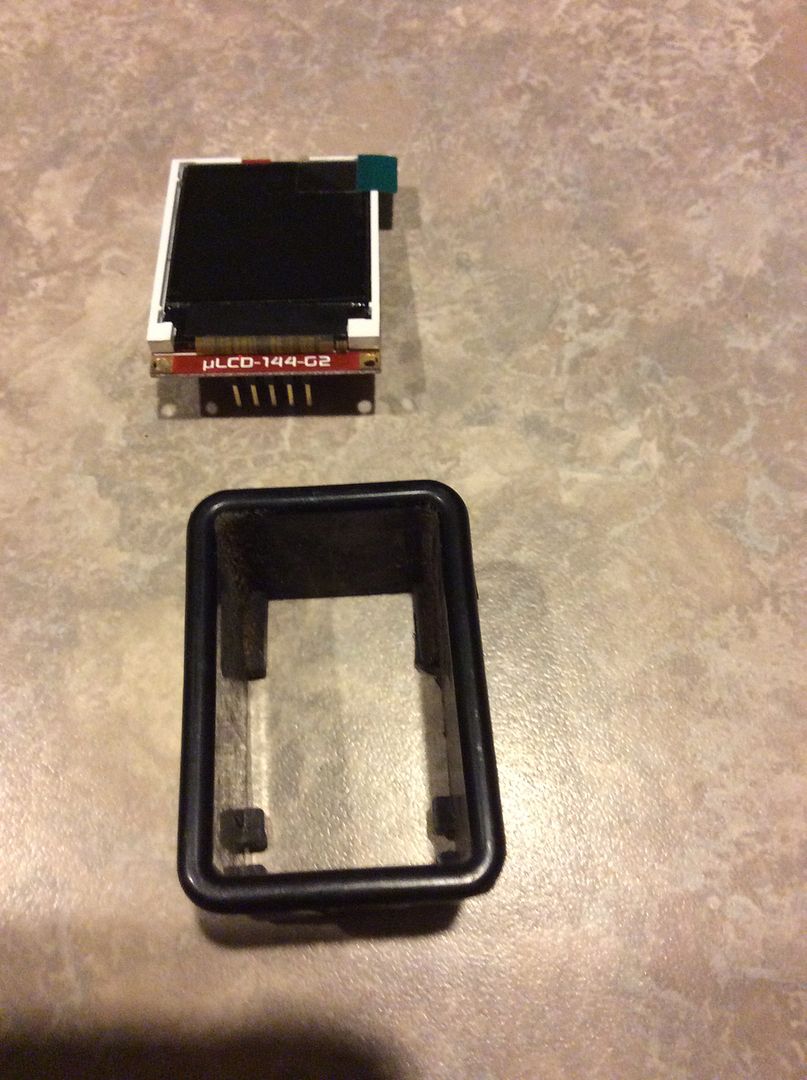
It's supposed to be a box I'll glue on top of an early switch bucket to house a uLCD-144-g2 display. It's only a tiny bit larger than the switch bucket.

It's my first attempt at a design and it kinda sucks. I'm using 123D Design on the iPad. I made four individual layers and carefully measured and removed the areas inside each layer. Upon stacking the layers nothing lined up. :mad4: I ended up adjusting the layers so the inside would be ok and I'll have to sand the outside surfaces flat again.

The idea is I dremel a channel in the back to glue a switch bucket, glue the display to the four pads inside, then glue in a masked off clear piece of plastic in the top.

I've never tried this before so I have no idea if this is even printable. The software can export an STL file.

I'd hope to get a printer at some point if I ever get past the learning curve of the drawing aspect.

7019a80dcc96b27c78796ae4a1f69c44.jpg


8659f1cc6aab6708438c54dd4889e8f6.jpg
 
Send me the file, I can slip it in amongst my other parts I have being done. karlmead at they g mail dot com thing I may adjust a few things, if you can assist me with understanding the design intent, I would be happy to try and get something to work for you.

It will need to be painted as our printer uses only creamy white resin.

Try using SketchUp Make on your computer (some of the Autodesk products are also free for your computer) which is free for non commercial use, although not perfect one can get pretty far with it
 
Now that I'm a little more familiar I'm going to start over tonight.

I realize I made an error on the bottom level anyway. The module shifts down 1.1mm so the connector (which will actually be toward the top) clears the bucket. I should have only shifted the two center layers, but shifted the bottom one too. That moves the bucket, negating the effect of the shift.

I like 123D Design on the iPad. If only I could tell it to align two objects corners rather than relying on visual. I create a layer and a "punch". If I could align a corner of the punch with a corner of the layer then I could enter absolute offsets so all the punchouts align when stacked. I actually did this, but had to align the corners visually, which obviously didn't work.
 
Send the revised version along with a bit more explanation of the secondary operations you think you need to do, perhaps I can include them in the base parts that are printed.

Or was the file you sent the latest version?

Karl
 
The file I sent was the latest version.

Secondary operations? Do you mean the stuff I intended to use a dremel for?

One was going to be a channel in the base into which the bezel of an early style switch bucket would fit. This will make the display sit flush on the console. The inside of the switch bucket should match up to the opening in the bottom of the part if I did it right.

The other is a slot in the layer with the "pads", the bottom, and the switch bezel itself. The microSD card sticks out a bit from the board and the socket is a bit tall. This I'll need to experiment with.
 
Screen%20Support.jpg


I will print two versions as shown. A mono bloc as you sent and a version which is broken into two pieces and should snap together.

The walls are quite thin so either way will be somewhat delicate.

You don't have much in the way of support for your clear cover at the top.
 
Very cool

It's cool to see how someone with skilz approaches this.

I struggled to create this out of four flat layers, and you have come up with some pretty intricate pieces in no time at all. Nice.

I think you're right that the layer below the "frame" for the clear cover doesn't leave much support. I should probably have thinned the "frame" up a bit to allow more support surface below.
 
Thanks. I will get then print going tomorrow. It will run with a bunch of other parts overnight so I should have something to photograph and send you on Wednesday.

Karl
 
They turned out fairly well. The snaps are pretty delicate due to their size.

Email an address and I will slip them in an envelope.

IMG_2951.jpg


IMG_2952.jpg


We could also print one that looks more like the existing switches with rounded edges and include the snap feature from the existing switch surrounds as part of it. I don't have an old style switch mount so I can't easily create one for you.
 
The harsh realities...

Of printing with PLA... I had a very cool speaker design (rev3) and printed a couple. Came out very nice and fit perfectly. I printed in clear (gives me the best quality for some reason) and painted with plastic paint.

Left them out in the hot sun on my deck today to help cure the paint from yesterday. ...and found them severely deformed. PLA can start warping as low as 80 degrees C. Perhaps hastened by the paint? In either case I'm now convinced that this is not workable for the speaker covers.

I've printed some other parts (console blanks, lock bezels, a leather gator mount, etc. which I think will likely be just fine. They're smaller and not "encouraged" by the application to warp since they're held in place. I'm also working on my 3rd brake light and will go fwd with it since the led will be secured to the PLA enclosure with epoxy resin which will (I think) ensure the shape will not warp. We'll see...
edd7cceb7fa60114e7fa920e60982f59.jpg

798070d0928337212a7a8cf2bdeda1cd.jpg
 
Musta cost a small fortune to print those...

Judging by the cost of the filament.
Too bad they warped Greg. Looked like nice work from the start.
I've been "eyeballing" 3D printers for a while, but I want superfine resolution and 2-color before I dive in.
 
ouch
I have found the limitation to printing parts is the material, PLA, ABS, is okay for some things and just not going to cut it for many applications.
Now that all the leg work is done though, can you whip out a set in ABS? Should be less prone to warpage.
If you want I can crank some out, I have a large spool of black ABS filament and my printer just sits these days.
 
Bob: Filament is relatively inexpensive. For what I pay in PLA these covers probably cost me less than $1 each to print.

Jeff: Was thinking the same and I'll try printing one in ABS to see how that goes...
 
I would pay $2 each plus shipping...I'm just saying.
Hope things work out with the heat issue.
I am just baffled by what everyone does on the forum. You guys are really talented in my eyes.
Keep up the great work.
V/r, Mike


Nebraska Mike
 
Its not just printed plastic that warps. The inner roll bar vents I had are so warped they fell out and wont go back

Do you have space to increase the thickness of maybe 1 in 3 or 4 of the "runners" on the underside of the grill? Looks like the worst of the warping came from the gaps in the edge pieces.
 
It's another step up in cost and complexity, but if you want the nuclear option to stop warping at moderate temperatures then you can print in carbon-fibre nylon. Making for Motorsport on youtube has printed intake manifolds from it and they've held up fine.
 
Back
Top